Modulation basics for synthesis and sound design
Modulation is an essential step in the process of working with sound. Put simply, it’s the part of the process that makes sounds move and change over time, rather than just remaining static and boring. It’s an absolute necessity in modern electronic music production.
In the free video below, synth expert D. Ramirez takes you through the basis of modulation – envelopes and LFOs. It’s part of his larger Synths & Sound Design course. To supplement this free video, we’ve set out the info he talks about in written form with a couple of graphs, to help it all sink in more deeply.
What is modulation?
In synthesis and sound design, modulation is the idea of changing something over time. You could easily hold a note playing a synth or sampler tone, and move one of the dials (for example the filter cutoff) while it plays, for a more interesting result. This is technically modulation, although usually we set up this kind of movement to happen automatically.
Using modulation, we could attach that filter cutoff to move automatically when the note is played, in a certain pattern that we set up. We could also make it move up and down rhythmically, without regard to when a note is pressed or released. These two movements make up most of modulation in synthesis – they’re called the envelope (related to the note being pressed) and the LFO (somewhat independent of the note being pressed).
Envelopes – or ADSR envelopes
An envelope is triggered when a note is pressed, and moves through a few stages as time moves on or as the note is released.
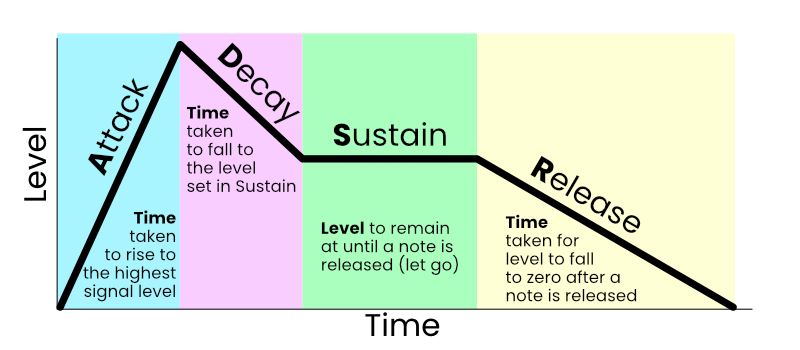
Attack – when a note is pressed, the envelope’s Attack setting determines how long it takes for the modulator to reach its full level. This is often set very short when the modulator is connected to the sound’s level, making for a quick transient. If the modulator is connected to the sound’s pitch, the Attack value could still be short, but a larger Attack value (a longer attack time) will make for a long pitch rise.
Decay – after the Attack stage is over, as the modulator’s output is at its highest level, the Decay stage will start. This stage determines how long it takes for the output to fall and reach the level set in the next stage.
Sustain – While a note is held, the Sustain level will determine the level output by the modulator. Note that Sustain is a Level, not a Time setting like the other parameters in an envelope.
Release – After a note is released, this parameter determines the time taken for the modulator’s signal to fall to zero. Imagine releasing a piano key and hearing the note ring out a little longer while the instrument engages its damper.
LFOs – Low Frequency Oscillators
Just like a synthesiser has oscillators that produce sound, an LFO is an oscillator tuned only to low frequencies. We can’t usually hear an actual sound from this oscillator, but since it’s a modulator, we can certainly hear its effects on the sounds it’s modulating.
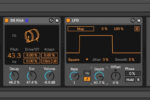
LFOs classically work at frequencies under 20Hz, and can go as low as is practically possible. Some LFOs may be locked to move up and down with the beat of a song, while others might move a sound up and down, in or out over the course of a few seconds, independent of the BPM of the track.
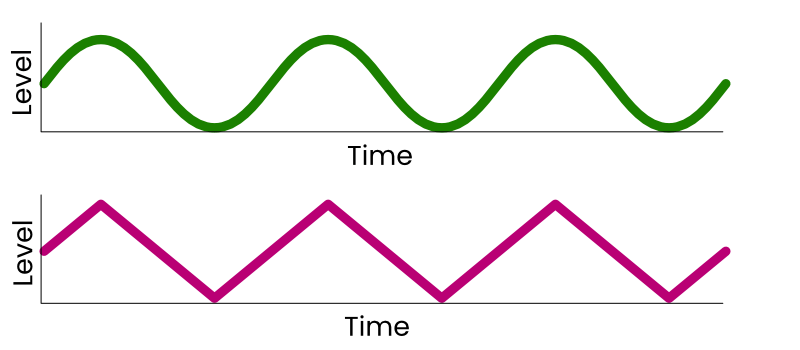
As you can see from the image above, an LFO can ‘waggle’ a signal both up and down from its original value. It can do this in a certain shape (sine in green and triangle in red are shown), it can do this at a certain frequency (rate), and it can do this at a certain depth. All these properties are usually selectable on a given synth or sampler.
If an LFO is sent to modulate a Pitch control, we might call this vibrato, as the notes are moved up and down rhythmically based on the rate and depth set. If an LFO is sent to modulate a filter’s cutoff, we’ll hear the filter opening and closing rhythmically. We could send a slow LFO to a sound’s pan control and recreate a rotary speaker-style effect. More complex destinations and patterns are usually possible too.
More Modulators
Getting into some more advanced modulation techniques, there are other modulator types too.
One example is an X/Y pad which lets a user move (and sometimes program a pattern of movement) onto a 2D display, with position controlling two values at once.
Then there’s a Velocity modulator, which takes the velocity of incoming MIDI notes to change values on a particular modulation parameter.
Your MIDI keyboard’s ‘mod wheel’ is also a modulator – hence the name – and can usually be hooked up to parameters of your choice.
In a way, you could argue that anything that has the ability to change a signal can be classed as a modulator. Then again, many would argue that other ‘types of modulator’ are just permutations of an LFO or envelope, and another value changed by the user.
Further parameters
How about some more variations on the two main modulator types we’ve introduced here?
Our ADSR envelope can be supplemented with other stages: an AHDSR envelope adds a ‘Hold’ stage after the attack; a DADSR envelope adds a ‘Delay’ stage before the attack phase starts to kick in whatsoever.
For LFOs, almost any combination of parameters can be effective, but some common additions to Rate, Depth and Shape include Trigger (to run the LFO as a one-shot signal), Offset or Phase (moving the start of the LFO’s cycle slightly earlier or later), and Monophonic/Polyphonic (effectively whether the LFO will control multiple notes with the same signal or with multiple signals, one for each note).
What’s next?
As you’ll have seen above, the possibilities for modulation to change the nature of a sound are pretty limitless. Mastering the art of modulation is a great skill to add to your music production capability so that you can adjust standard synth presets into something unique to you.
If you want to dive into more details of sound design, check out D.Ramirez’s Synths and Sound Design course.