Guide to Learning Modular Synthesis

Learning modular synthesis can seem like a daunting task, but we’re here to help with our getting started guide
Whether you’re a hardware synth enthusiast or a software devotee, there is no shortage of instruments available to help you make and shape sounds for your mixes. Whilst there is huge sonic variation between hardware and software synths, the vast majority of instruments provide an ‘integrated’ approach, with individual synth modules chained together internally, under the hood, out of sight. Sounds can be extensively edited – but there is no need to patch an Oscillator into a Filter, for instance, as the connection between these modules is automatic.
But in the last few years, modular synthesis has enjoyed a huge rise in popularity, with a broad range of developers building modules of all kinds – Oscillators, Filters, LFOs and Envelopes, Drum Machines, Pattern Sequencers, Effects Processors and a giant swathe of Utility modules to let you take your sonic experiments to new and unexpected places and to build instruments of your own. But let’s back up.
If you’re familiar with synthesisers handling the chaining of their component pieces together for you, how and where do you get your head around modular synthesis?
Understanding synth modules
The best way to answer this question is break a ‘conventional’ synth down into its component pieces.

Broadly speaking, most synths use Oscillators as waveform generators to begin the process of making sound. Different waveforms contain different harmonics, so the core sound of a sine wave (with no harmonics) is different from sawtooth, square and triangle waves, which offer different combinations of harmonics and, therefore, different sonic starting points.
The signal from the Oscillator stage is then sent to a Filter to let you shape a sound’s tone. Filters remove various harmonics from the Oscillator stage, before the signal is then sent on to an Amplifier to control overall Volume.
Alongside these three modules, LFOs exist to let you interrupt a sound by using another Oscillator waveform to shape the behaviour of the Oscillator, Filter or Amplifier. By connecting an LFO to the Amplifier, for instance, the volume of the sound can move from quiet to loud to quiet to loud, undulating up and down to produce a Tremolo-style effect.
Envelopes can be used to shape sound over time. To take one example, we don’t want synth sounds to play in a sustained way, forever. So we can use an Envelope to control how Volume behaves, only switching on when we play a note, and then deciding how long it will take for a sound to fade out when we let go of it.
Classic Envelope shapes use four stages – Attack (to set how long a sound takes to fade in), Decay (which drops level once the Attack Time is finished), Sustain (which sets the holding Volume whilst you hold a note down) and Release (which controls the fade out time).
The 5 key synth modules
If the behaviour of those five modules (Oscillators, Filters, Amplifiers, LFOs and Envelopes) makes sense, modular synthesis will too.
As per the explanation above, if you were to chain together the individual modules of those component modules, you’d have the chance to control and build synth sounds just as a fully integrated synth does.
Modular synths work by sending control voltage signals (CV) which flow from one module to the next. Think about it like this – the heart of a modular synth is like a lake of water being held back by a dam. That lake is like control voltage – it’s full of potential energy, just waiting for you to decide where it’s going to flow. And every time you plug in a patch cable, you’re creating a channel to allow some of that voltage to start flowing.
So, if you were to connect the output of an Oscillator module’s waveform to a Filter’s input and connect the output of the Filter to an Amplifier, and then connect the Amplifier’s output to your speakers or headphones, you’d hear sound, as you’d have created a flow through those component pieces.
However, it would be a sound over which you’d have very little control. The Oscillator has no controller selecting its pitch, for instance, and the Amplifier will be wide open, just playing that Oscillator back, steadily, with no variation, forever. To shape it into something musically useful, we need more modules.
Getting started with modular synthesis
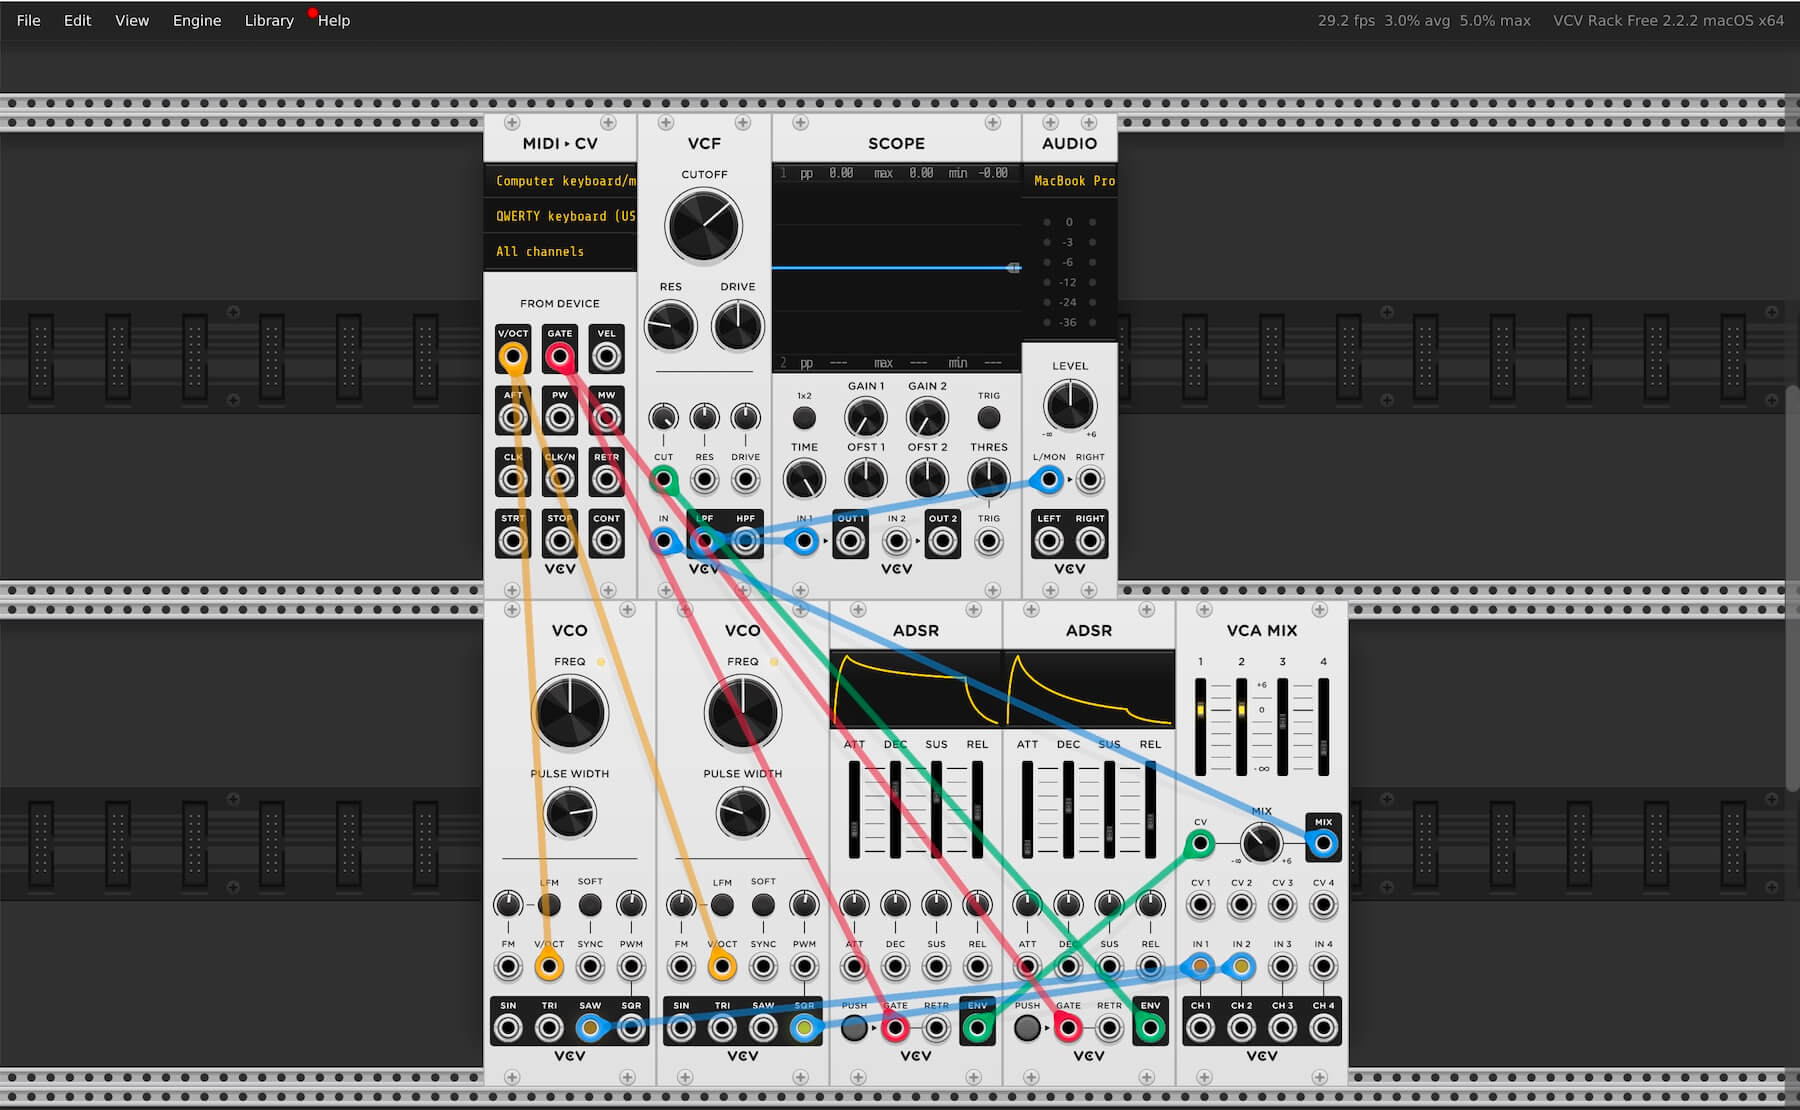
At this point, we’d highly recommend downloading the free VCV Rack 2 plug-in to begin your journey into modular synthesis without having to commit to any financial spend. When you’ve downloaded the plugin, download the starter patch we’ve created and open it in VCV rack. It looks like this.
The VCV Rack patch explained
Look at one module at a time and follow the flow.
At the top of the interface is a MIDI-CV interface. Many modular synths provide one of these; they turn MIDI data into control voltage so that when you press C3 on your MIDI keyboard, for instance, the control voltage is set to produce that pitch. Consider this module the control centre for how your MIDI keyboard’s messages trigger behaviour in your modular synth.
Oscillators
From here we can see two yellow connections from the V/Oct port to the equivalent ports on the two VCO (Voltage Controlled Oscillator) ports below. These route the signal from your MIDI keyboard (or the Qwerty keyboard as MIDI trigger) to the Oscillators. You’ll notice that you can change the pitch of the note played by adjusting the FREQ knob on each of the Oscillators. (If you want to know which musical note relates to your chosen frequency, check out our Interactive Note Frequency chart!)
At the bottom of the Oscillators, you can choose one of four waveforms. In this patch, the Saw wave of Oscillator 1 and the Square wave of Oscillator 2 are patched into separate inputs of a VCA (Voltage Controlled Amplifier) Mixer module. Like any mixer, this lets you bring in multiple sound sources and adjust their volume before sending them out as one signal, together. The VCA Mixer’s output is sent to the VCF (Voltage Controlled Filter) input, and the LPF (Low Pass Filter) output is sent to the L/Mon Input of the Audio module, where – in yellow – you can select your output at the top. This can be your audio interface, your computer’s speakers or a pair of headphones – your choice.
Envelopes
Next, at the bottom, come two Envelopes, labelled ADSR. The output of Envelope 1 is sent to the CV input of the VCA Mixer and therefore controls volume over time, with the Attack, Decay, Sustain and Release Sliders controlling volume behaviour.
The second of the Envelopes is sent to the VCF Filter cutoff, controlling tone over time. The VCF’s Low-Pass Filter output is also being sent to a Scope module, which lets us see the waveform we’ve produced through the synth stage which changes as we modify the VCF Filter cutoff dial or any of the other sound shaping parameters.
Gate controls
Lastly, the two red cables from the Envelopes into the MIDI > CV module need explaining. These are Gate controls. Think back to our dam of water example for a moment and then imagine a sluice gate built into the side, opening and closing to regulate the flow of water, so that it doesn’t steadily drain away. Gates in the context of our modular synth are similar. We want the behaviour of a MIDI keyboard to open a gate and allow a signal to flow only when we play a note.
Other modules and objects can act as Gate triggers too. If we used a pattern sequencer module, each of its steps could output a Gate Trigger to make notes play, for instance.
Get experimenting!
When you’re starting out on a modular synthesis journey of discovery, take your time. Making patches of your own is fun and a great opportunity to learn sound design from the ground up. And your experiments will make you understand so much more about integrated synths too, increasing your understanding of what’s possible when it comes to making and shaping sounds.
What’s next?
To continue your journey into understanding synthesis, why not check out our Studio Shorts “Intro to Synthesis” lessons or delve into the fundamentals of sound in our Science of Sound series.
